
Petite Alterations: Making of the Solina Jumpsuit
I’m short. Like really short. Short all over. The technical term for this ‘Petite’ meaning all he sections of my body are basically shrunken…proportionately. Short torso. Short arms. Short legs. You get the drift.
This is one of the most convincing reasons I originally began to sew. The ability to scrap the bottom 5 inches of all my jeans was an exciting prospect and I dove right in.
But that was high school. Fast forward to the present where I have an absolute field day slicing and splicing together frankenstined cropped versions of every dress and jumpsuit sewing pattern I come across that are often inevitably designed for a willowy 5’7” sample model who is undoubtedly…not me.
Consequently I was thrilled to get my hands on a new sewing pattern book earlier this year put out by Name Clothing, an independent sewing pattern company run by two exquisitely creative kiwis out of New Zealand (links below!) entitled; Breaking the Pattern. The book is arranged with twelve sewing projects (pattern included!) in ascending level of complexity and on my first flip through I snuck a peek at the Solina Jumpsuit and knew we’d be spending some quality time together.

Breaking the Pattern by Saara and Laura Huhta of Named

Sample photo of the Solina Jumpsuit in all its yet-to-be-sewn glory!
The process begins with the paper pattern. Getting to know and actually understand my body proportions has been surprising over the years as I still find myself tweaking new areas each time I start a new piece, evidence that we, as individuals, are always changing and evolving.
I know that before I even think about cutting into fabric, I’m going to lay out my paper pattern pieces and so some serious surgery.
For a jumpsuit were coving the torso and rise (i.e. crotch) so alterations will run the full gamut. Here’s my list:
Remove 1 inch across the center of the bodice, straight across from side seam to side seam. Then, redraw my dart legs keeping the apex point (nipple!) at the same place.
Remove 1 inch across the center of the pant , straight across from hip to hip seam through the rise, a couple of inches above the crotch line (indicated on the pattern).
This ones tricky: remove 1/2” from the Center Front. This pattern piece is 'Cut on Fold’ which means that when I remove 1/2” equally straight down the front I’ll be removing an inch from the neckline (and neck facing) all the way to the waist which will affect my waist circumference. Which means…
Remove 1/2” from each side seam of my front and back pant legs at the waist line to match the circumference of the adjusted bodice. Because my hips are pretty flat, I’ll take this new hip line pretty far down, shaving off some extra fabric which I wish I needed but sadly don’t, before merging it back into the original side seam.
Finally, the straps are a bit thick for me so I’m going to narrow them up by remove 3/4” from the outside of the strap (armhole side) on the Front Bodice, Back Bodice, and corresponding Facing pieces (yes, this is a lot of work, but worth
Now we can finally cut into some fabric!

Notice how short the side seams look. Cut this way, the waist will actually fall at my natural waistline.
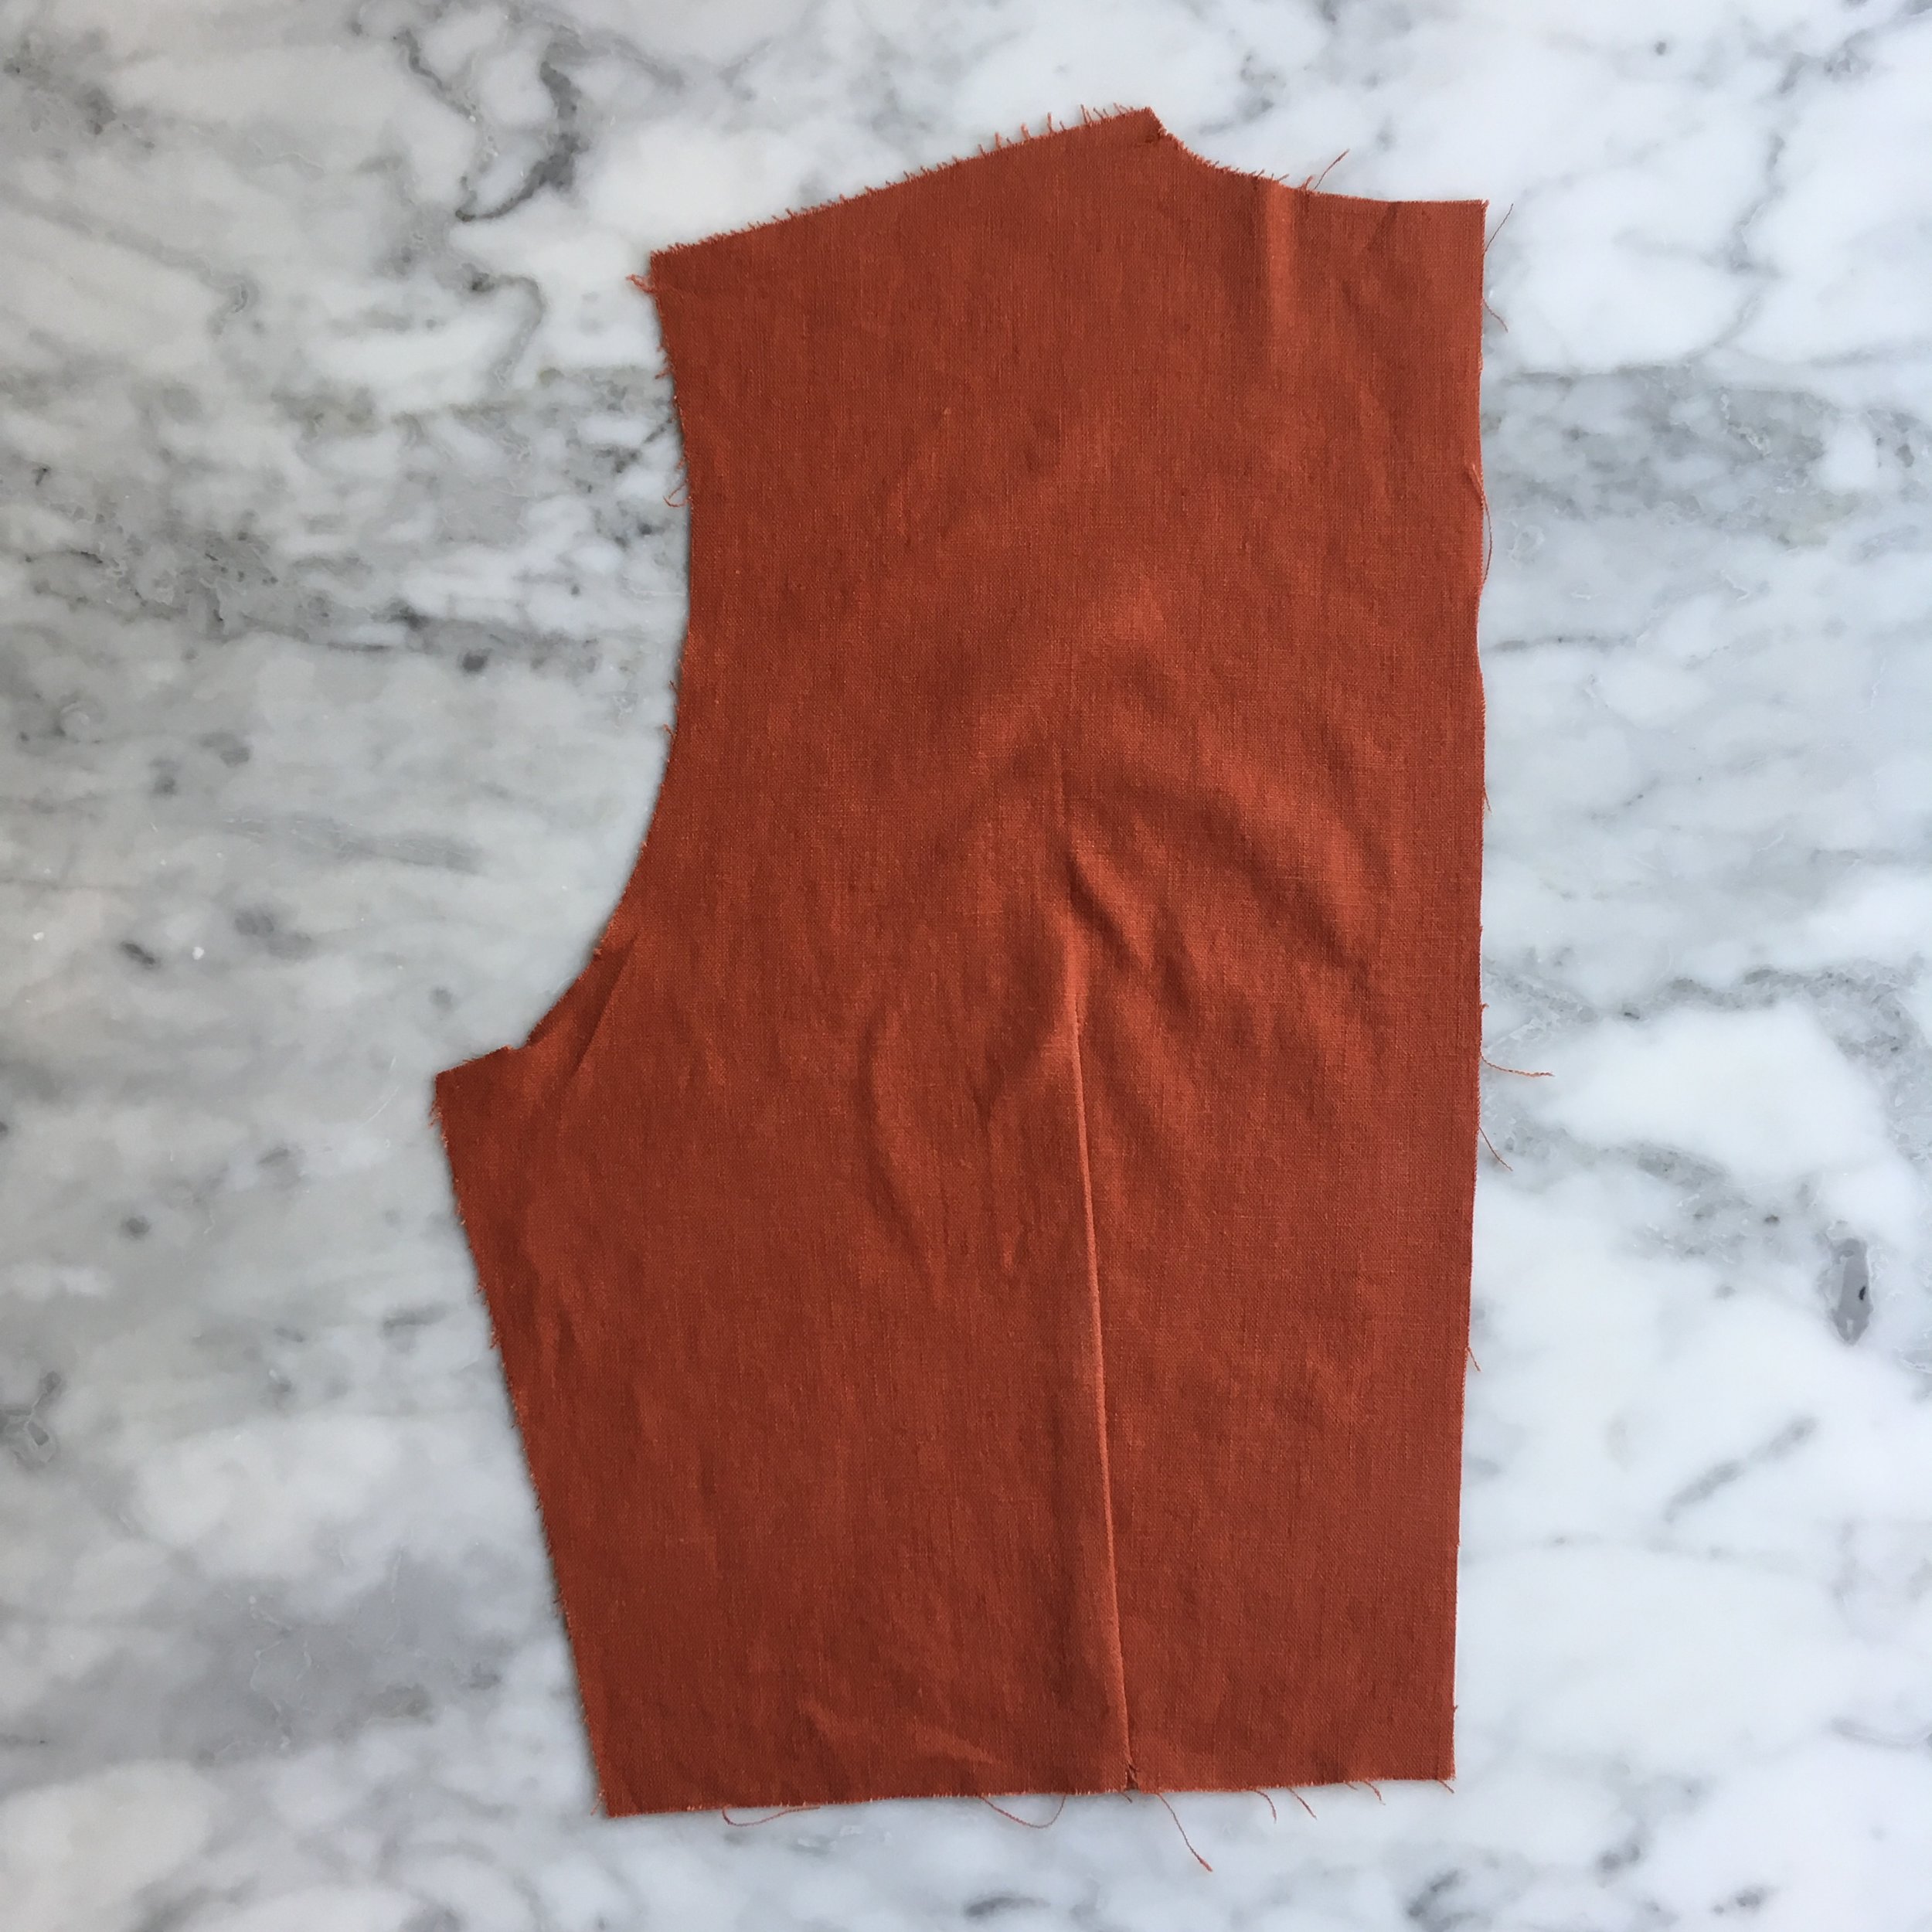
The back pieces here emphasize that its important to keep the point of the darts in the same place after removing the section horizontally from the middle. You don’t want that dart point creeping up above your shoulder blade. Weird.

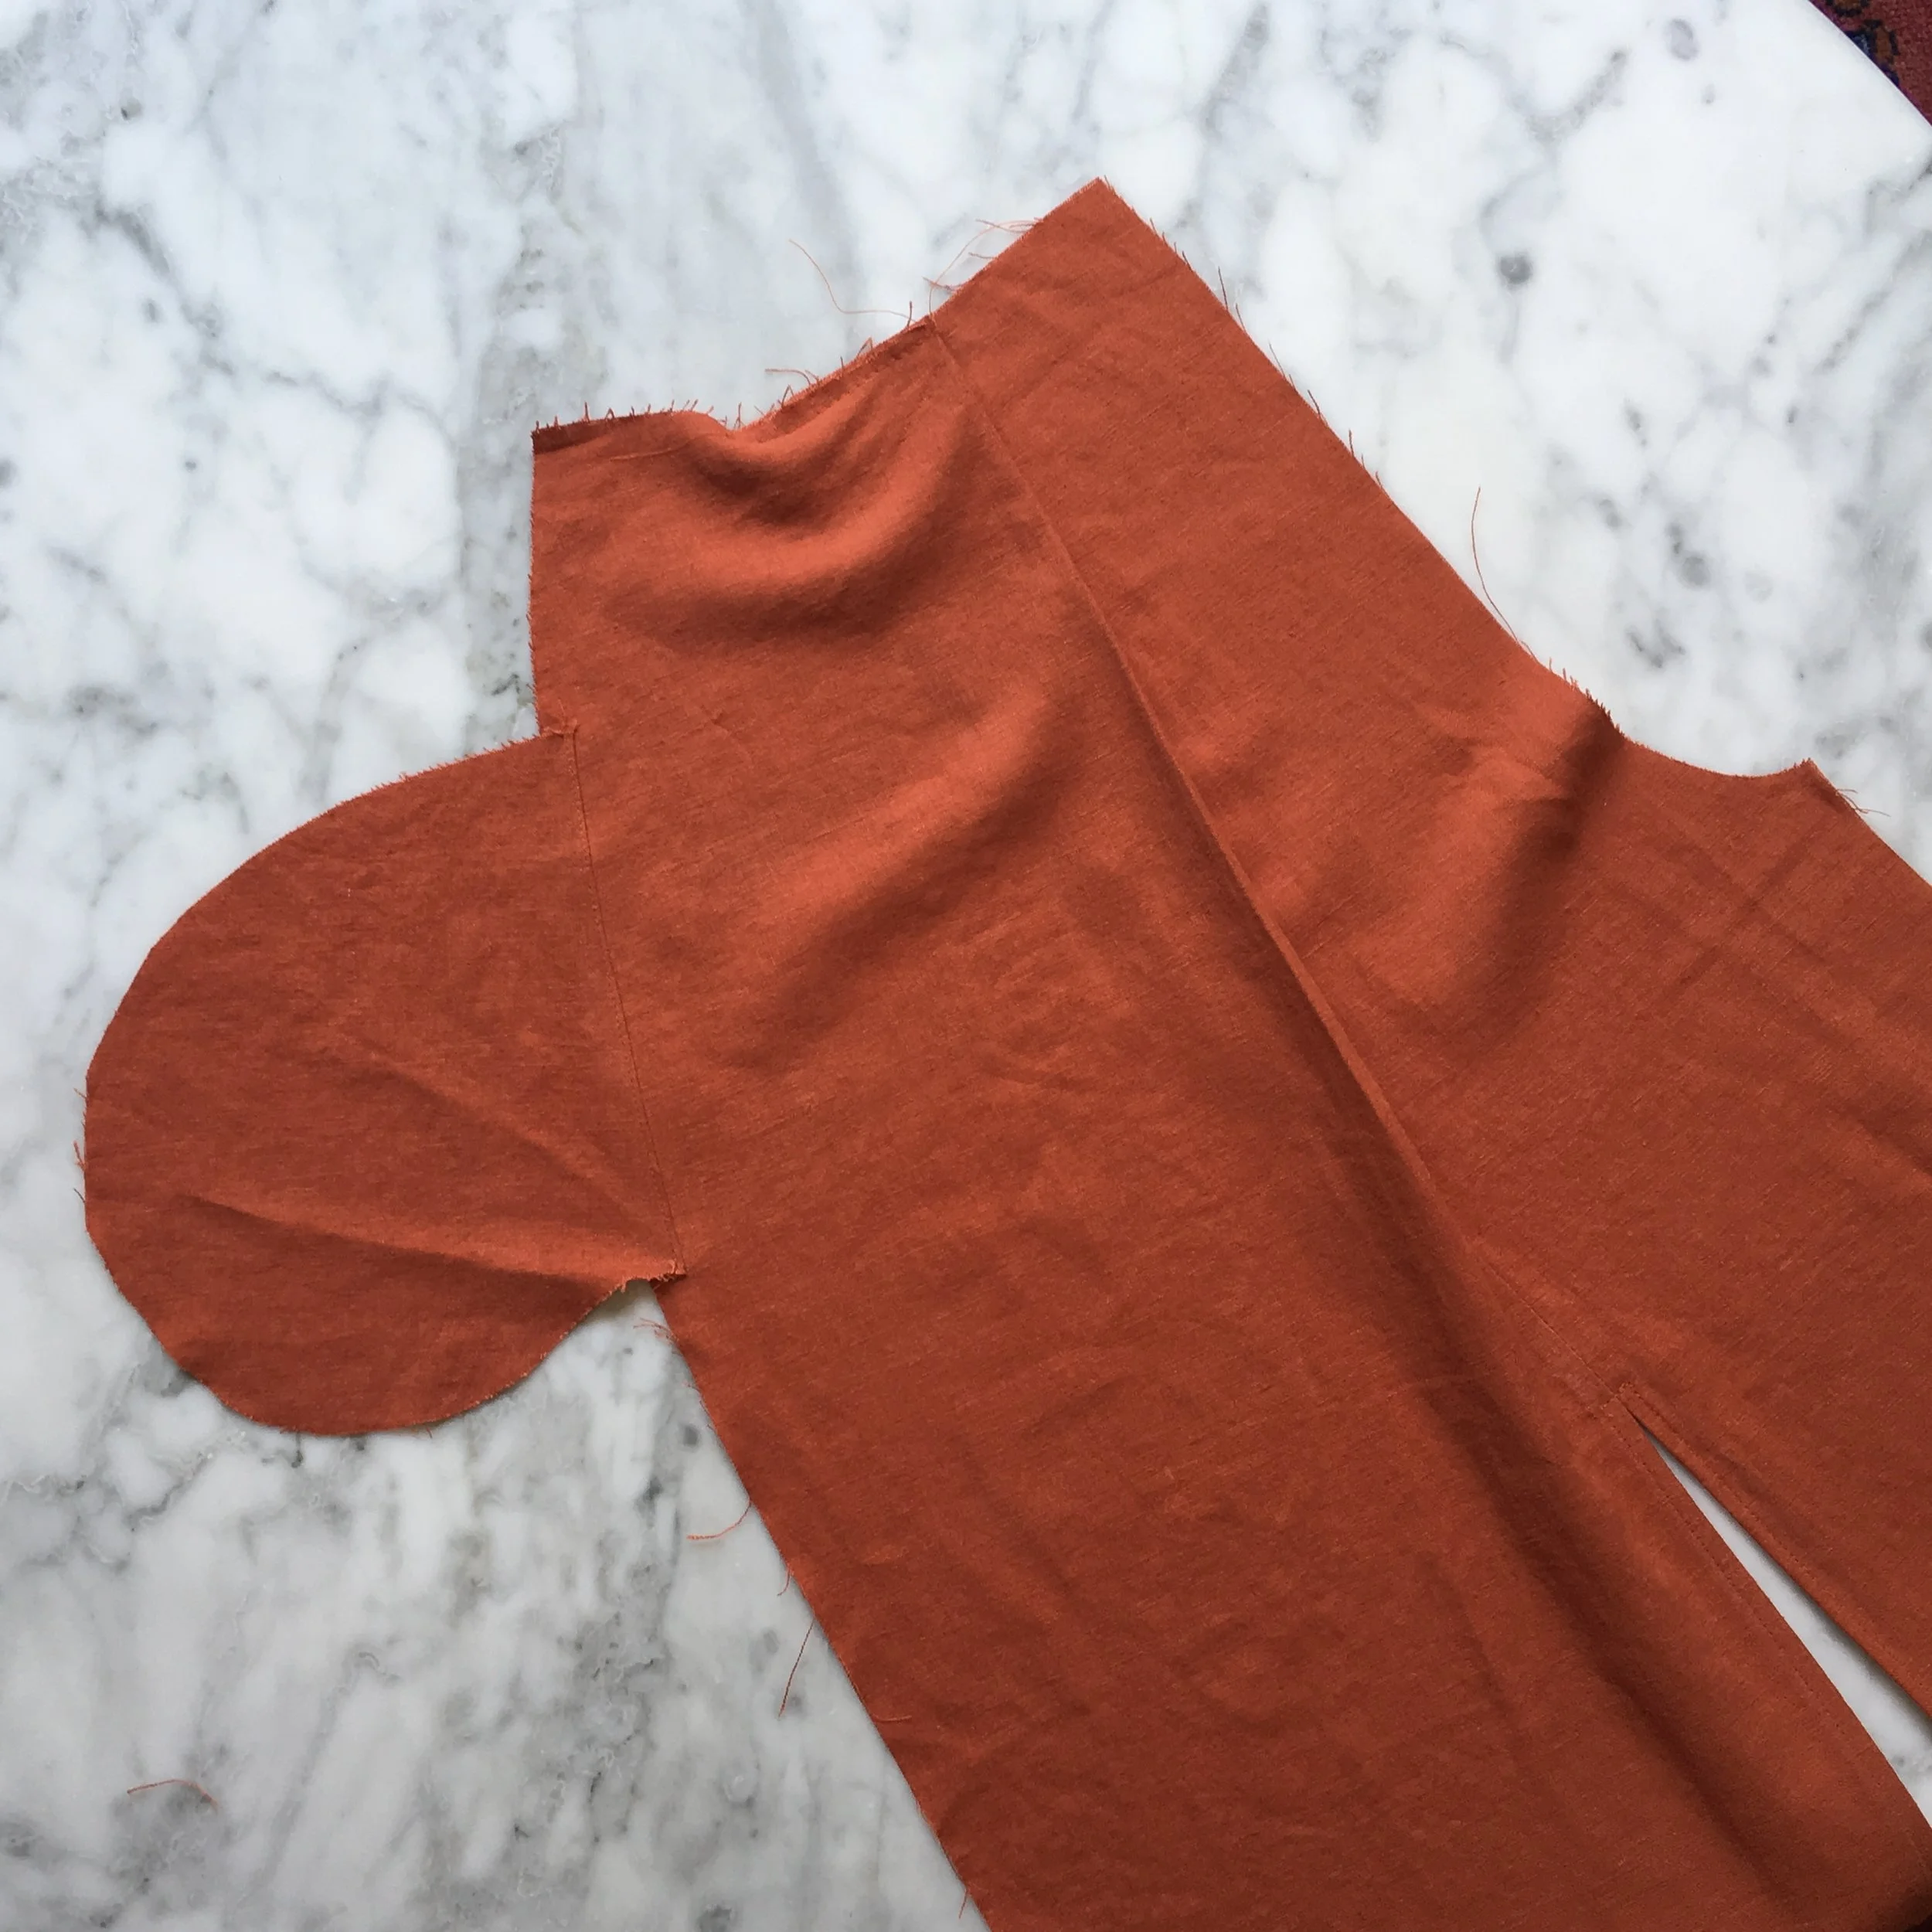
The one-in-one facing piece is totally key. Your looking at the aerial view of the front facing at the top connected at the shoulders to the back facings that will join the zipper where they are broken.
Ok, our fabric is cut, our darts are sewn and we’re ready for a loose try-on. This is where I will assemble the top, stitching the shoulders and side seams but not doing any finishing, and throw it on for a quick check-in.
When I see that everything looks good, I add the facings and cute detail (hello adorable tie in the front!) and after some careful understitching to keep everything in place I move on to the pant.

In the pattern, the darts are left clean and the model belted the jumpsuit overtop but I love a good all in one piece when I’m traveling and don’t have the energy to look after accessories so I added my own tie here to give the design a little somethin extra.
Now, I know that this design is intended to be loose so I’m pretty confident that the rise will fit well as I assume it was already a comfortable fit so I’m going to plow straight ahead and add the pockets as I sew. When the side seams and crotch are stitched up, I’ll throw those on for a quick look as well.
Everything looks good! I love the simple breezy pant detail of leaving slash up the front seam to just above the knee. It give this pant a chic looks and keeps it cool during these hot Oklahoma days!
I love how funky the pockets looks before it gets hidden away inside the pant.

This is the completed front section of the pant that has a chic slip up the front reinforced by some clean top stitching.
With my top and bottom separately assembled and finished, all I have to do is join them up! An easy seam around the center an then a zipper inserted with my trusty blind zipper foot and its just about time for the debut!
But then I remember.
Like I said, I’m short. And I was looking for a cropped look on this jumpsuit. So I went when many reckless sewists have gone before and hacked myself off a good 10” so that my hem would be rested just about mid calf. A quick double turned hem and some hot and steamy pressing and it’s ready!!
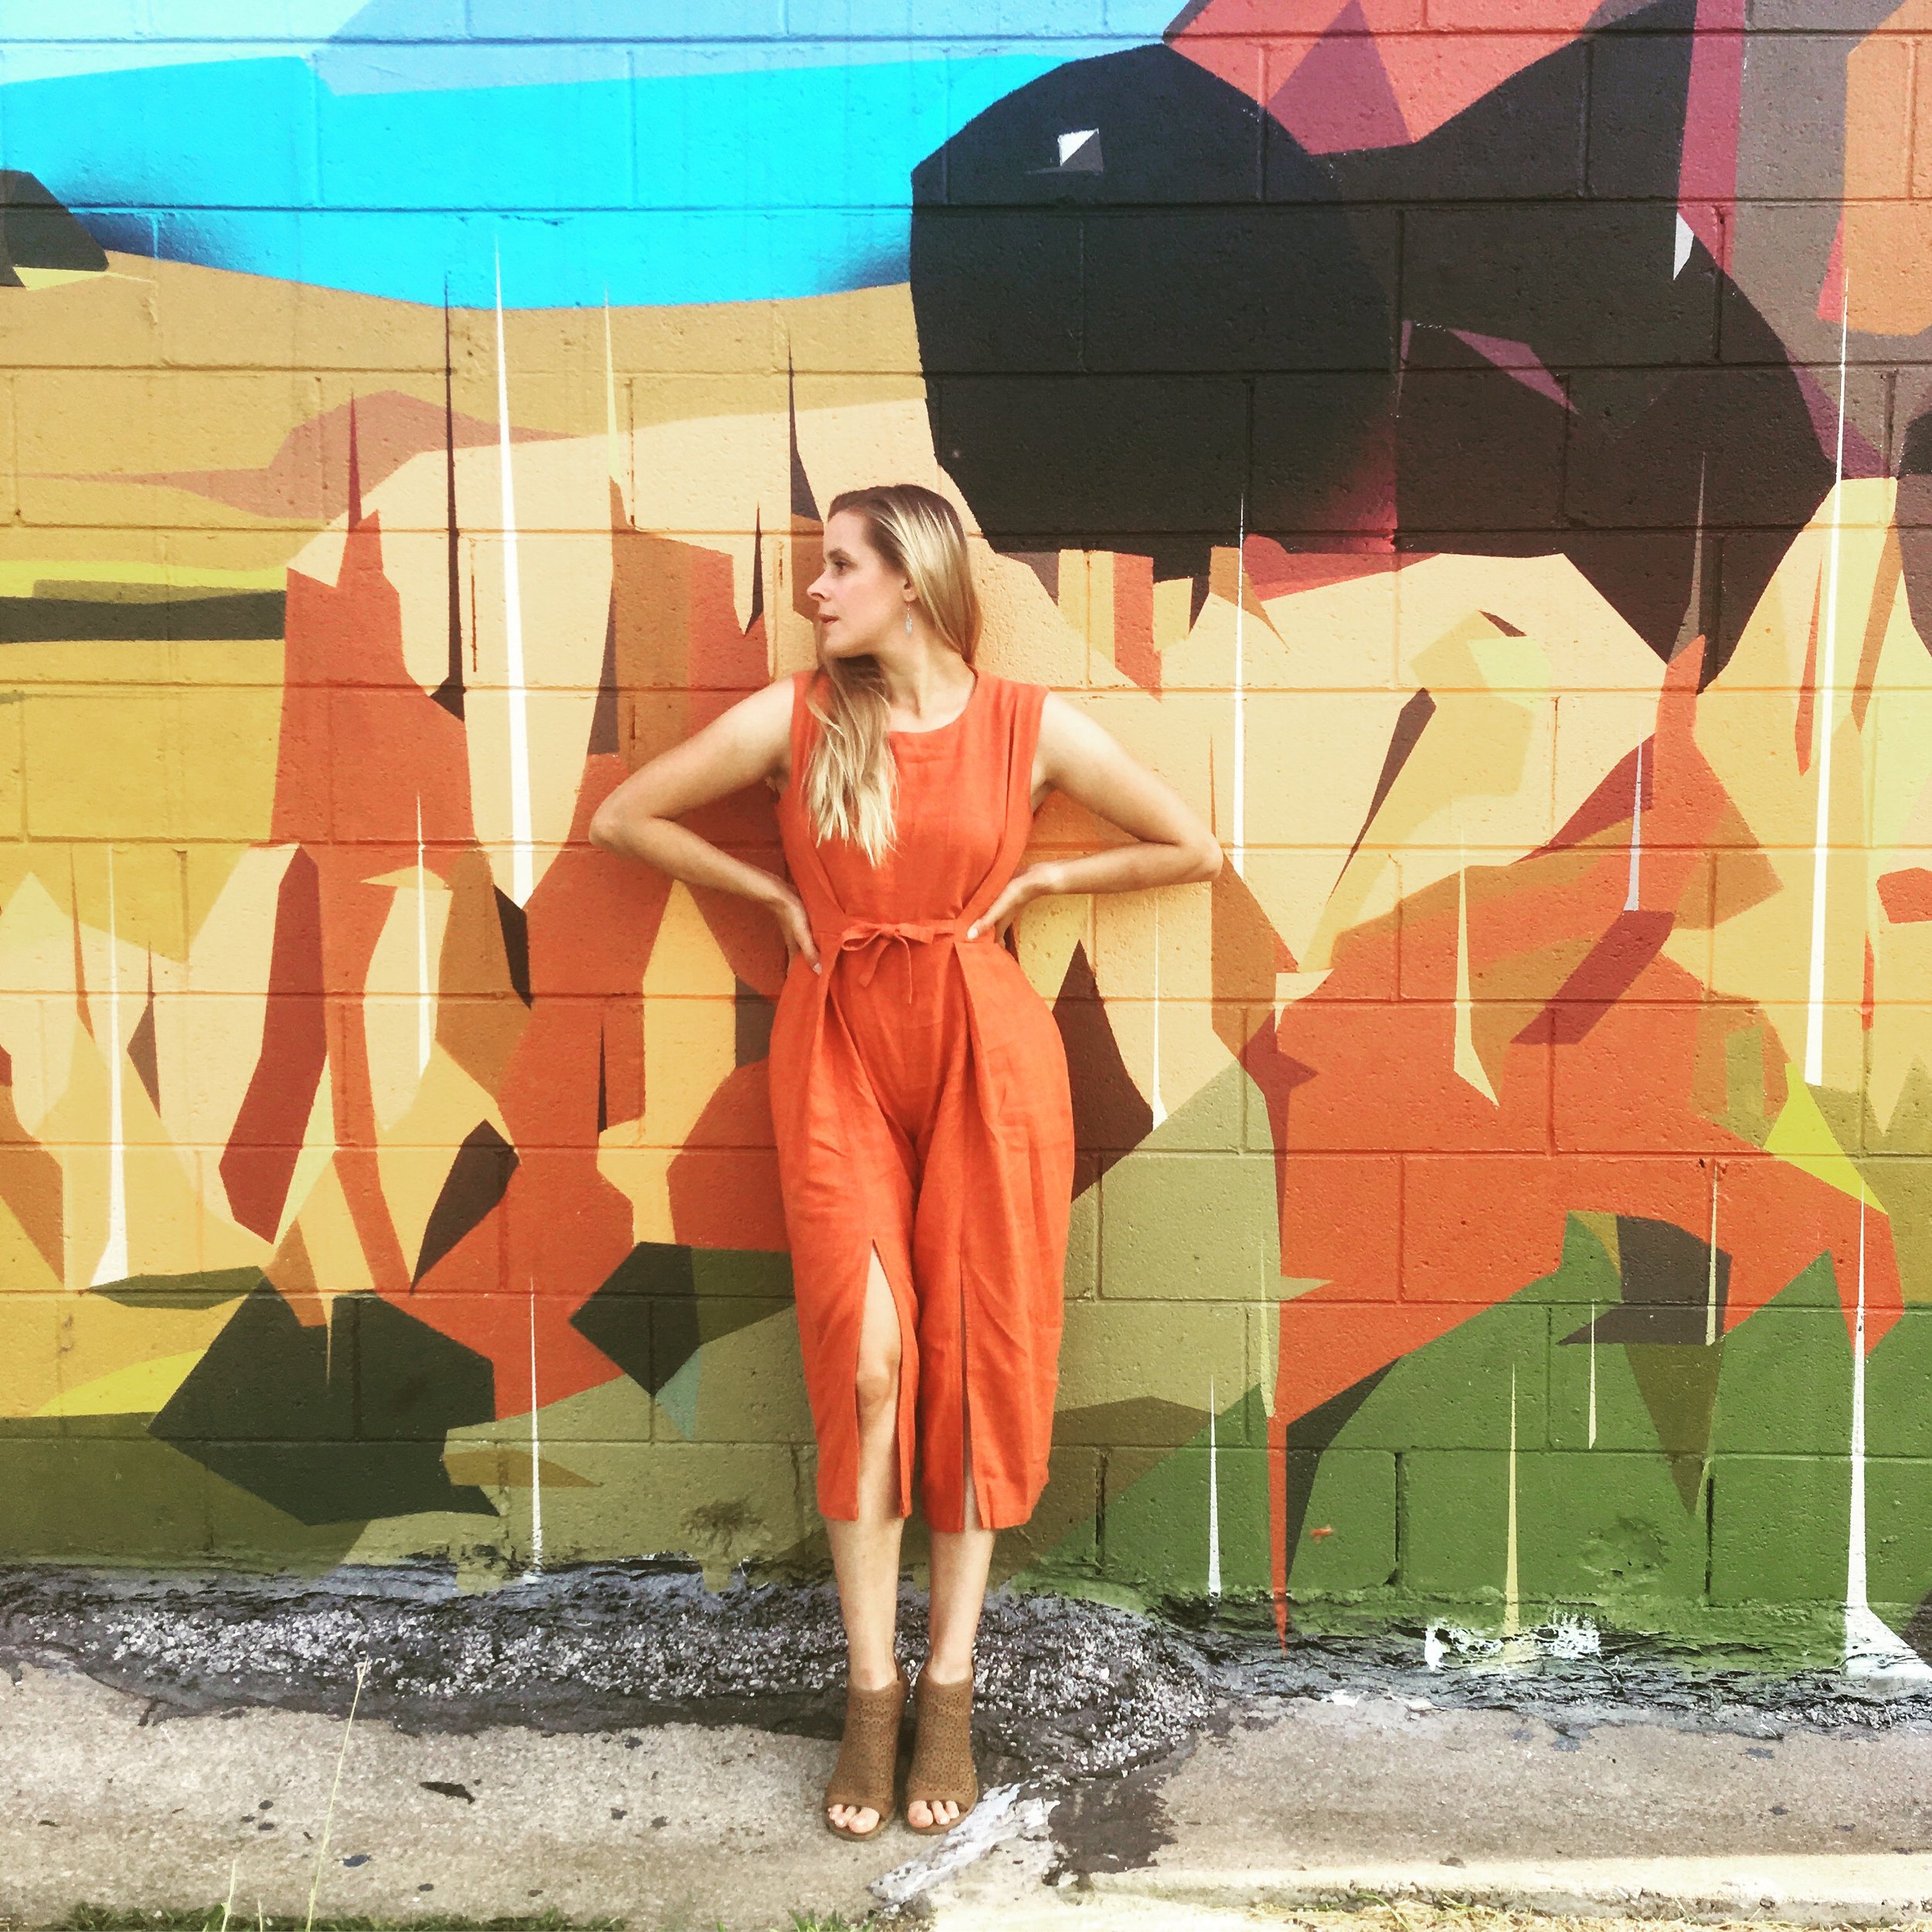
Enjoying the view of the city against this incredible mural of our beautiful frontier.
The perfect wall as a backdrop is always the cherry on top isn’t it?
One last shot I couldn’t resist including. During a break from my hotel sewing room (where this little number was actually made) I found this poor button a little down on his luck…just goes to show, everyone needs a good tailor!

‘The Button’ Supposedly referencing a button that flew off the coat of Benjamin Franklin at The University of Pennsylvania and cracked on the sidewalk, forever commemorated and larger than life.
Thanks for reading!!
Helpful Links!
Breaking the Pattern Book - https://www.namedclothing.com/shop/breaking-the-pattern-a-modern-way-to-sew/
Named Clothing - https://www.namedclothing.com/
Invisible Zipper Foot - https://amzn.to/2Zkp1tb